文章目录
前言
Java自定义注解一般使用场景为:自定义注解+拦截器或者AOP,使用自定义注解来自己设计框架,使得代码看起来非常优雅。本文将先从自定义注解的基础概念说起,然后开始实战,写小段代码实现自定义注解+拦截器,自定义注解+AOP。
一、什么是注解(Annotation)
Java注解又称Java标注,是JDK5.0版本开始支持加入源代码的特殊语法元数据。
Java语言中的类、方法、变量、参数和包等都可以被标注。和Javadoc不同,Java标注可以通过反射获取标注内容。在编译器生成类文件时,标注可以被嵌入到字节码中。Java虚拟机可以保留标注内容,在运行时可以获取到标注内容。当然它也支持自定义Java标注。
java_17">1,java内置注解
@Override:定义在java.land.Overide中,此只适用于修饰方法,表明一个方法声明打算重写超类中的另一个方法声明
@Deprecated :定义在java.land.Deprecated中,此注释可以用于修饰方法、属性、类,表示不鼓励程序员使用这样的元素,通常是因为它很危险或者存在更好的选择
@SuppressWarnings:定义在java.lang.SuppressWarnings中,用来抑制编译时的警告信息。与前两个注释有所不同,你需要添加一个参数才能正确的使用,这些参数都是已经定义好的
@SuppressWarnings(“all”)、@SuppressWarnings(“unchecked”)、@@SuppressWarnings(value={“unchecked”,“deprecation”})
2,元注解
@Target:
描述了注解修饰的对象范围,取值在java.lang.annotation.ElementType定义,常用的包括:
- METHOD:用于描述方法
- PACKAGE:用于描述包
- PARAMETER:用于描述方法变量
- TYPE:用于描述类、接口或enum类型
@Retention:
表示注解保留时间长短。取值在java.lang.annotation.RetentionPolicy中,取值为
- SOURCE:在源文件中有效,编译过程中会被忽略
- CLASS:随源文件一起编译在class文件中,运行时忽略
- RUNTIME:在运行时有效
只有定义为RetentionPolicy.RUNTIME时,我们才能通过注解反射获取到注解
@Documented
表示注解将被包含在javadoc中
@Inherited
表示子类可以继承父类中的该注解
二、如何自定义注解
使用 @interface自定义注解时,自动继承java.land.annotation.Annotation接口
分析:
- @interface是用来声明一个注解,格式 public @interface 注解名{定义内容}
- 其中的每一个方法实际上是声明了一个配置参数
- 方法的名称就是参数的名称
- 返回值类型就是参数的类型(返回值类型只能是基本类型,Class,String,enum)
- 可以通过default来声明参数的默认值
- 如果只有一个参数成员,一般参数名为value
- 注解元素必须要有值,我们定义注解元素时,经常使用空字符串、0作为默认值
说了这么多给个代码案例应该就懂了
public  class  Test{
    // 注解可以显示赋值,如果没有默认值,就必须给注解赋值
    @MyAnnotation(name = 1,favolate = {"ds","dfd"})
    public void go(){

    }

}

// 可以作用在class和方法上
@Target({ElementType.TYPE,ElementType.METHOD})
@Retention(RetentionPolicy.RUNTIME)
@Documented
@Inherited
@interface MyAnnotation{
    //注解的参数 参数类型+参数名()
    String value() default "";
    int name();
    // 参数类型为数组
    String[] favolate() default {"bug"};
}
三、注解的应用
1,反射获取注解
类注解
package com.custom;

import java.lang.annotation.ElementType;
import java.lang.annotation.Retention;
import java.lang.annotation.RetentionPolicy;
import java.lang.annotation.Target;

/**
 * 类名注解映射表
 * @author LiuCheng
 * @data 2021/2/26 11:41
 */
@Target(ElementType.TYPE)
@Retention(RetentionPolicy.RUNTIME)
public @interface TableAnnotation {
    String value();
}
字段注解
package com.custom;

import java.lang.annotation.ElementType;
import java.lang.annotation.Retention;
import java.lang.annotation.RetentionPolicy;
import java.lang.annotation.Target;

/**
 * 属性注解
 * @author LiuCheng
 * @data 2021/2/26 11:43
 */
@Target(ElementType.FIELD)
@Retention(RetentionPolicy.RUNTIME)
public @interface FileAnnotation {
    String cloumName();
    String type();
    int length();
}
实体类中引用注解
package com.custom;

/**
 * @author LiuCheng
 * @data 2021/2/26 11:45
 */
@TableAnnotation("db_student")
public class Student {
    @FileAnnotation(cloumName = "s_id",type = "int",length = 50)
    private int id;
    @FileAnnotation(cloumName = "s_name",type = "varchar",length = 20)
    private String name;

    public Student(int id, String name) {
        this.id = id;
        this.name = name;
    }
}
测试,通过反射获取注解
 @Test
    public void handlerAnnotation() throws ClassNotFoundException, NoSuchFieldException {
        Class c1 = Class.forName("com.custom.Student");
        // 通过反射获取注解
        Annotation[] annotations = c1.getAnnotations();
        for (Annotation a : annotations ) {
            System.out.println(a);
        }
        // 获取注解的value的值
        TableAnnotation tableAnnotation = (TableAnnotation)c1.getAnnotation(TableAnnotation.class);
        String value = tableAnnotation.value();
        System.out.println(value);
        // 获取类指定的注解
        Field f = c1.getDeclaredField("name");
        FileAnnotation fAnnotation = f.getAnnotation(FileAnnotation.class);
        System.out.println(fAnnotation.cloumName());
        System.out.println(fAnnotation.type());
        System.out.println(fAnnotation.length());
    }
测试结果
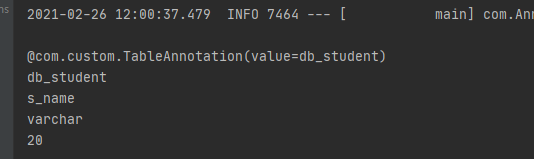
可以看到通过反射可以获取注解的属性值,如表名,表字段,那是不是可以写sql了呢
2,自定义注解+拦截器 实现登录校验
接下来,我们使用springboot拦截器实现这样一个功能,如果方法上加了@LoginRequired,则提示用户该接口需要登录才能访问,否则不需要登录。
首先定义一个LoginRequired注解
package com.custom;

import java.lang.annotation.ElementType;
import java.lang.annotation.Retention;
import java.lang.annotation.RetentionPolicy;
import java.lang.annotation.Target;

/**
 * @author LiuCheng
 * @data 2021/2/26 13:54
 */
@Target(ElementType.METHOD)
@Retention(RetentionPolicy.RUNTIME)
public @interface LoginRequired {
}
然后写两个简单的接口,访问sourceA,sourceB资源
package com.controller;

import com.custom.LoginRequired;
import org.springframework.web.bind.annotation.GetMapping;
import org.springframework.web.bind.annotation.RestController;

/**
 * @author LiuCheng
 * @data 2021/2/26 10:17
 */
@RestController
public class DemoController {
    @GetMapping("/sourceA")
    public String sourceA(){
        return "resourceA";
    }
    @GetMapping("/sourceB")
    public String sourceB(){
        return "resourceB";
    }
}
没添加拦截器之前成功访问

实现spring的HandlerInterceptor 类先实现拦截器,但不拦截,只是简单打印日志,如下:
package com.interceptor;
import com.custom.LoginRequired;
import org.springframework.lang.Nullable;
import org.springframework.web.method.HandlerMethod;
import org.springframework.web.servlet.HandlerInterceptor;
import org.springframework.web.servlet.ModelAndView;
import javax.servlet.http.HttpServletRequest;
import javax.servlet.http.HttpServletResponse;
/**
* @author LiuCheng
* @data 2021/2/26 13:58
*/
public class SourceAccessInterceptor implements HandlerInterceptor {
@Override
public boolean preHandle(HttpServletRequest request, HttpServletResponse response, Object handler) throws Exception {
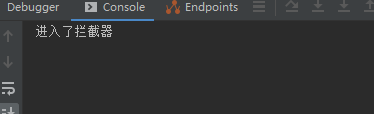
System.out.println("进入了拦截器");
return true;
}
@Override
public void postHandle(HttpServletRequest request, HttpServletResponse response, Object handler, ModelAndView modelAndView) throws Exception {
}
@Override
public void afterCompletion(HttpServletRequest request, HttpServletResponse response, Object handler, Exception ex) throws Exception {
}
}
实现spring类WebMvcConfigurer,创建配置类把拦截器添加到拦截器链中
package com.config;

import com.interceptor.SourceAccessInterceptor;
import org.springframework.context.annotation.Configuration;
import org.springframework.stereotype.Component;
import org.springframework.web.servlet.config.annotation.InterceptorRegistry;
import org.springframework.web.servlet.config.annotation.WebMvcConfigurer;

/**
 * @author LiuCheng
 * @data 2021/2/26 14:01
 */

@Component
public class InterceptorTrainConfigurer implements WebMvcConfigurer {
    @Override
    public void addInterceptors(InterceptorRegistry registry) {
        registry.addInterceptor(new SourceAccessInterceptor()).addPathPatterns("/**");
    }
}
拦截成功如下
在sourceB方法上添加我们的登录注解@LoginRequired
package com.controller;

import com.custom.LoginRequired;
import org.springframework.web.bind.annotation.GetMapping;
import org.springframework.web.bind.annotation.RestController;

/**
 * @author LiuCheng
 * @data 2021/2/26 10:17
 */
@RestController
public class DemoController {
    @GetMapping("/sourceA")
    public String sourceA(){
        return "resourceA";
    }
    @GetMapping("/sourceB")
    @LoginRequired
    public String sourceB(){
        return "resourceB";
    }
}
简单实现登录拦截逻辑
 @Override
    public boolean preHandle(HttpServletRequest request, HttpServletResponse response, Object handler) throws Exception {
        System.out.println("进入了拦截器");
        HandlerMethod handlerMethod = (HandlerMethod) handler;
        LoginRequired methodAnnotation = handlerMethod.getMethodAnnotation(LoginRequired.class);
        if(methodAnnotation ==null){
            return true;
        }
        // 有loginrequire的注解时需要登录,提示用户需要登录
        response.setContentType("application/json;charset=utf-8");
        response.getWriter().print("请先登录");
        return false;
    }
运行成功,访问sourceB时需要登录了,访问sourceA则不用登录


3,自定义注解+AOP 实现日志打印
先导入切面需要的依赖包
 <dependency>
            <groupId>org.springframework.boot</groupId>
            <artifactId>spring-boot-starter-aop</artifactId>
        </dependency>
定义一个注解@MyLog
package com.custom;

import java.lang.annotation.ElementType;
import java.lang.annotation.Retention;
import java.lang.annotation.RetentionPolicy;
import java.lang.annotation.Target;

/**
 * @author LiuCheng
 * @data 2021/2/26 14:43
 */
@Target(ElementType.METHOD)
@Retention(RetentionPolicy.RUNTIME)
public @interface MyLog {
}
定义一个切面类,见如下代码注释理解:
package com.aspet;

import org.aspectj.lang.ProceedingJoinPoint;
import org.aspectj.lang.annotation.Around;
import org.aspectj.lang.annotation.Aspect;
import org.aspectj.lang.annotation.Pointcut;
import org.springframework.stereotype.Component;

/**
 * @author LiuCheng
 * @data 2021/2/26 14:44
 */
// 表名这是一个切面
@Aspect
@Component
public class MyLogAspect {
    /**
     * Pointcut表示   这是一个切点, @annotation 表示这个切点切到一个注解上,值为带改注解的的全类名
     * 切面主要的就是切点,所有通知都围绕切点发生
     * logPointCut()代表起点名称
     */
    @Pointcut("@annotation(com.custom.MyLog)")
    public void logPointCut(){

    }
    // 环绕通知
    @Around("logPointCut()")
    public void logAround(ProceedingJoinPoint joinPoint){
        // 获取方法名
        String methodName = joinPoint.getSignature().getName();
        String typeName = joinPoint.getSignature().getDeclaringTypeName();
        // 获取入参
        Object[] params = joinPoint.getArgs();
        // 拼接入参信息
        StringBuilder sb=new StringBuilder();
        for (Object obj : params ) {
            sb.append(obj+";");
        }
        String logInfo="进入===  "+methodName +"方法===,参数为: "+sb.toString();
        System.out.println(logInfo);
        // 继续执行方法
        try {
            joinPoint.proceed();
        } catch (Throwable throwable) {
            throwable.printStackTrace();
        }
        System.out.println(methodName+ "   执行完毕");
    }
}
在Controller写一个sourceC进行测试,加上我们的自定义注解:
 @GetMapping("/sourceC")
    @MyLog
    public String sourceC(String name){
        return "sourceC";
    }
启动springboot web项目,开始测试

日志输出

总结
注解使用主要还是基于和反射结合使用,后面都是扩展出来的